Pages

Mar 28, 2013

Twice Baking: Some basics

Good day folks!

I wanted to address twice baking basics for a couple of you to continue from our molded pot tutorial.

Twice Bake:
Did you know you can bake polymer clay several times?

When you are producing a item that has different levels of thickness such as a doll you will be baking your item a few times at different amounts. So the thick items get a longer bake then we add more features at a shorter bake.

This way your working with a solid piece you can hold and press into without warping the shape.

I had more pots but I had this massive enamel blowout yesterday, so less to show  =(**
 
Lets use a simple pot I picked up from a yard sale as a idea.
 
Now the pot above has simple shapes - a center ball, a base ring, a lid with ring rim and some handles. Think of this item and use its parts when thinking about baking a simple pot.
 
Bake a oval middle 1 bake - a lid 2 bakes - a couple of handles 3 bakes

So start with a simple shape, ball, oval.. bake your item.
 
Sand it a bit to prep it for additions
 
Cut a few shapes and twist them a bit as you like
 
Use some translucent liquid clay TLS for attaching some details
 
A dab will do 
 
Then you can attach the details as you like
 
SO here is a few progression pictures to show the process, We will bake sand and add details till we feel comfortable with holding the item. then bake in between.


Any other questions feel free to mail me or add in comments below, lets see what you make!

Mar 27, 2013

Otterine wins big! : and Brea wins my heart ;)

Good Morning Folks!

You all know Brea's Blog, Otterine.com blog, I am not even going to act like you don't.

Well Brea is a amazing dollhouse builder but you knew this. She is also a fantastic craftslady extraordinaire , you did know this as well?

Did I also mention she has now added winner of the 2013 Best Miniature Blog Winner In The Readers' Choice Awards to her list of being a kickass mini gal?

Well Brea is all of those things but she is also a wonderful lady and a thoughtful swap partner :)

I want to show you a few pictures of the amazing and thoughtful stuff she has sent me for my Holiday Inc: Dollhouse. Brea sent me wonderful things for each room!

Then you can go off and admire her a bit more from the links above ;P
________________________________________
 
Brea sent me a array of amazing gift wrap for all of the seasons in my house. She made me rolls of paper that I can place in my shop and sent extras so that I can do a some wrapping for extra gifts!
 
She also included this wonderful Easter wrapped gift box and this Halloween pumpkin box, I LOVE these little black cats!
 
These books are just awesome, I told Brea that I could use some hauntingly ghoulish books to place in the Halloween room and she did not disappoint! I now have books to place on the wonderful writing desk from my friend Jenn over at dark side of a mini addict.
 
Did I ever mention I LOVE little books???

Now Brea sent me all these amazing things even though I only asked for this next item ;) The Bird Feeder is just superfantabulous? That is a word right?

I loved these since I first saw them on her Etsy Page now I have one of her wonderful bird feeders for my summer room!

 
Brea you beautiful mini gal, thanks again honey, I am blown away!.
 
 
Ok folks go look through her wonderful stuff and give her a pat on the back for her amazing blogging skillzzz! ;)


Mar 25, 2013

Mold making update: quick pots and shapes

Good evening folks,

I wanted to do a quick tutorial on the small pots that I made, I promised Daria I would write about it, but my camera battery died this morning.

In any case I will attach a pixelated 20 second video at the end to show the mold shaping, I will have to update it tomorrow with a better version.
______________________________________________________


Mold Making: as I posted here about making items and utilizing a mold to reproduce the item we are going the same route, except we are going to look with our mini eye to find shapes and create cloud monsters..er small items ;)

As you can see I have searched in the most reasonable spot, the bathroom.. I have the ends of makeup and nail polish, small caps from eye drops and other medicines and also a wooden pot from your standard woodsie pack.

You can choose any shape you like but a small item that you can place into your mold mix would work the best such as a cap. that way it sets up as a mold without warping. You see here I have created different molds from end of things, dollhouse pots and various baked polymer clay items.
 
This one is my "go to" mold for small pots, bowls anything I want with a rounded bottom, remember twice baking a simple mold can reproduce something quite special..more on that next time.
 
While you can use any color clay your heart desires, I use the same technique for rustic pots pans and dishes.
 
These are mixed clays with a small part of sand or pepper to simulate stone /granite and stonewear.I also like to use metallic effect clays and dull them down a bit.
 
When shaping to your mold you will need a bit of cornstarch and a small brush for the clay to flow in your mold, also so your stylus does not stick.
 
To start lightly dust your mold with cornstarch, press in your clay, then add a slight dust on top to help the stylus glide and press the clay into the form.
 
Remember the hardest part of the forms are the outside shape and smoothness so by shaping from the inside you will be getting a great outer form.
 
Now this next part is gliding the stylus in to the mold, I did it quickly just to show you the motion but you can get the idea here until I update the video.
 
well..I did say it was bad.... but you see how you would shape, pots bowls, cups to your varying molds that you can make from household items, You can sand or cut down your lumps, create rounded edges or add more clay to add details.
 
 
Let me see how yours turn out ;)
 

Mar 24, 2013

A little bit of green: Miniature plants and swear words

Good Morning folks!

Boy I have been posting like crazy huh?.. It's good because my ideas will dry up soon like a little raisin ;P

Today I wanted to show you the fruits of my cursing up a storm..er labor. To continue from the other day of leaf stamping.

Quiz time:
  • Question:  How many times did Jane drop the plants?
  • Answer:    A whole F'in bunch  >=)

Translucency is key here, we all have tons and tons of translucent clay right? *smirk*

When you do decide to start to work on foods or plants, always remember using parts of translucent clay are going to help you make a item that has a more realistic quality to it.

I am still working on the best way to make the plants, in some of these I have prebaked the leaves and stems and crazy glued them on, some I have baked the stem into the pot and shaped unbaked leaves onto the stems and some I have just layered into a small pot with a  bit of cornstarch in between.

These plants of course are EXTREMELY delicate but for personal use or glue down they would be fine.

Anyways..on to the show.........


Now here is where you can see what I am talking about with translucency. You can see the different clays I have mixed in to these leaves and also some of the veins.
 
Again here is some clay colors mixed in the miniature leaves and some caulk. The stems are also twisted up bits of leftover translucent clay.
 
Some of the same leaves just a different looking plant I added a flower to change it up a bit.
 
Details
 
My flowers still suck but I am practicing :P
 
More crap flowers
 
This one shows the range of the same leaves slightly mushed mixed or shaped, but you can see the variations you can get with just stamping and shaping a bit of the clay.
 
Try it out and let me know about your miniature clay plant adventures!
 
Any questions feel free to ask in comments.
 

Mar 23, 2013

Box load of love: Lyssa sends me some WOW!

Good morning good folks!

Can I just say how amazing Lyssa from Can't Have it Big? Make it mini! is?? Ok I will.

Lyssa: Mom, wife, mini magician, lady of Mt. Ollopa winner of HBS/miniatures.com's 19th Annual Creatin' Contest and all around great gal!

Lyssa was my Mrs. Claus last night!

I came home after a dreadful day of "big shopping" not the fun kind..the I need a 50 pack of toilet paper kind...

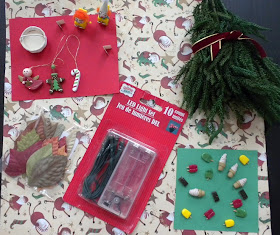
Mrs. Claus..er Lyssa had a big ole box of lovely gifts waiting for me to make me smile! Here are a few pictures of what amazing stuff she gifted to me.

 
Lyssa knows that the other thing I had been whining about was not finding any Lycopoduim, she was kind enough to give me a massive amount!
 
This is my first light set, its is going to be awesome to have real lights in the shop! 
 
As you can see she also sent me wonderful sweets for summer time, I Will drool on these later ;) 
 
You can see a lovely woven basket here its so beautiful! It's the kind of beautiful when your husband comes by and says wow I like that basket! He's not a miniature guy;P
 
And of course wonderful Christmas decorations and Halloween cards to make the store more festive:) 
 
Now these little wonders you have seen on her website! I did tell her that I was so glad she sent them because I was about to harass her into making me some. BUT NOW THEY ARE MINE!!!! 
 
Lyssa your awesomesauce! Thanks again from the depths of my mini heart hon!


_________________________________________
 
We will finish up green stuff tomorrow ;)


Mar 22, 2013

Thinking on greenery: Complaining to friends

Good Morning folks!

I have been complaining to a few friends about not being able to make a damn flower or plant to save my mini life, I whine and moan about it... but I think its more about things we like to do and things we have to work our ass off for..

The greenery is my unicorn.

I love little plants and pots, flowers etc, I have seen how others make small plants and flowers and they never seem to turn out the way I think they should..

So after whining to my blog friend..again ;) I decided to tuff it out and just mass produce my own method of greenery.

Here are some things I learned:

Step one: If you can't make a copy of a particular species..minifanatisize it...make it your own.

Step two: Make a cheap plain cutter and change your pattern a bit to make 10 different leaves.

Step three: Mix versions of each level of the scrap clay you make for the next set of leaves.

Step four: butt pillow....and back support ;P
___________________________________________________________________
 
Make a quick cutter out of a piece of hard foil or as I have done here shape a eraser off of a pencil into the pattern of your choice. 
 Mix translucent clay with greens of your choice. We all have lots and lots of translucent clay don't we?
Lay one green in the center of the other and kind of feather it out to get different variegated patterns
Use your nifty new cutter to cut out leaves and lay some lines or patterns into the leaf with a blade or a wooden tool. 
Shape and twist your leaf as you like or simply roll them off of your fingers in to the baking tray in different ways to make curls or bends.
 
You can always add a bit of chalk to the
leaves to reduce shine or darken the corners and add hues to the middle.
As you can see here I made 4 cutters just by twisting a bit of the metal eraser around to elongate the leaf or make a rounded pattern. Then you would press along the edges for a cut look or add veining as you see fit.
Each leftover piece of clay I had from the previous batch of leaves, I smeared into the next to make different colors or patterns.
 
Now all I have to do is make pots and turn them into plants..to be continued ;)


Mar 18, 2013

Minifanaticus Easter Givaway: The winner...boing! *wink*

Good morning folks,

I hope everyone had a great weekend! While I was going to make this whole post and stall and joke with some big write up..I got to go shopping today so I won't be.... too silly ;P

As you know the Minifanaticus Easter Giveaway is today, The winner of this draw will be receiving this:
 
I have used a random number generator amongst the 50 comments:


As I count the comments down, number 23 is Ms. Plushpussycat aka.. Jennifer, I believe?

Jennifer you have won this Minifanaticus Giveaway for Easter. Please contact me via Etsy as the safest route with a mailing address.
____________________________________


Thank you to all the participants in this spring giveaway. I welcome new readers and thank my old readers in continued fellowship.

Summer is next.. *wink*